Foldr provides integration with Office 365 to allow OneDrive for Business and SharePoint Online sites to be presented in the Foldr interface. Foldr can also provide access to the document storage locations that are available to users through Office 365 Teams.
Active Directory accounts may be automatically linked to Office 365 accounts and the corresponding OneDrive &/or SharePoint sites can be presented in the Foldr interface. Users can alternatively link a Microsoft Office 365 accounts manually. Manual linking will present a pop-up dialog requesting the user’s Microsoft account credentials the first time they try to access OneDrive, SharePoint Online or a Teams share in Foldr.
Once an Office 365 account is linked in Foldr, a user can edit any on-premise or cloud hosted Office files in Office Online (web-based versions of Word, Excel & PowerPoint). Collaborative editing is also possible through Office Online with SharePoint Online.
Manual or Automatic Account Linking?
The administrator should decide which method of account linking is to be used in the deployment as there are benefits to both methods. Automated account linking uses a service account to provide immediate access to user’s OneDrive and SharePoint sites with no additional effort from the user. However, the connection always uses service account credentials, rather than those of the individual user. Only the manual account linking method can respect the granular Office 365 user’s permissions for sites and nested sub-folders in SharePoint.
Essentially, if only OneDrive is being presented to users through Foldr, then automated linking would provide a smoother user experience and remove the need to enter the Office 365 credentials the first time it was accessed. If you intend you present SharePoint sites, then it would be recommended to use manual linking, unless the security permissions in place in Office 365 are flat across the organisation, with no granular access permissions.
Regardless of the account linking method used, the administrator can still control visibility of all storage locations (OneDrive, SharePoint libraries, Teams) using permissions in Foldr Settings >> Shares, specifying read/write access by user or group.
Integration Steps – Automatic Account Linking
Creating the App Registration in Azure
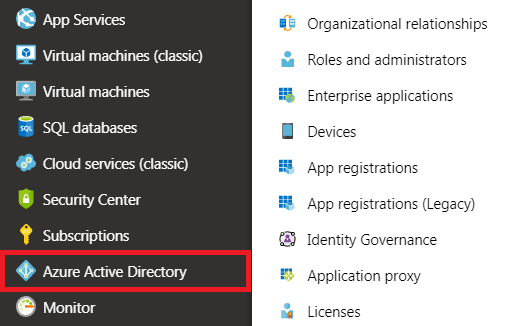
1. Log into the Microsoft Azure Portal at https://portal.azure.com using your administrative Microsoft account.
2. Select Azure Active Directory from the left hand panel.
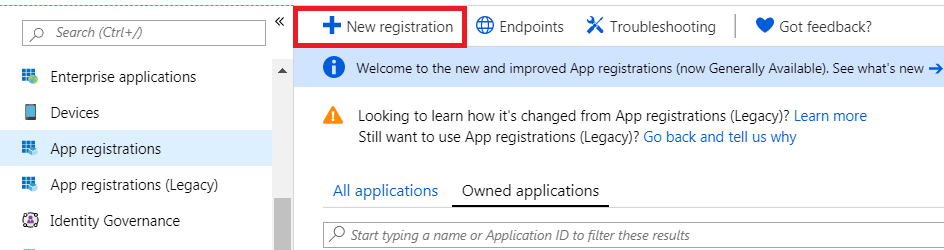
3. Click Application Registrations >> New Application
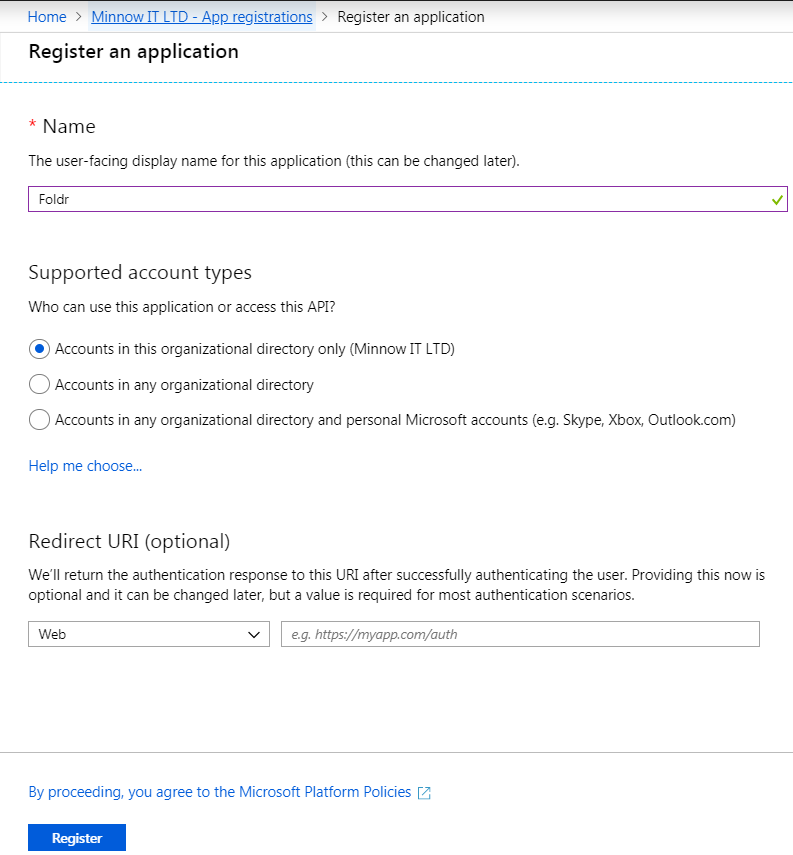
4. Give the application a suitable name, and click REGISTER. In most cases the supported account type can be left as default (top radio button)
5. Click Certificates & secrets > New client secret.
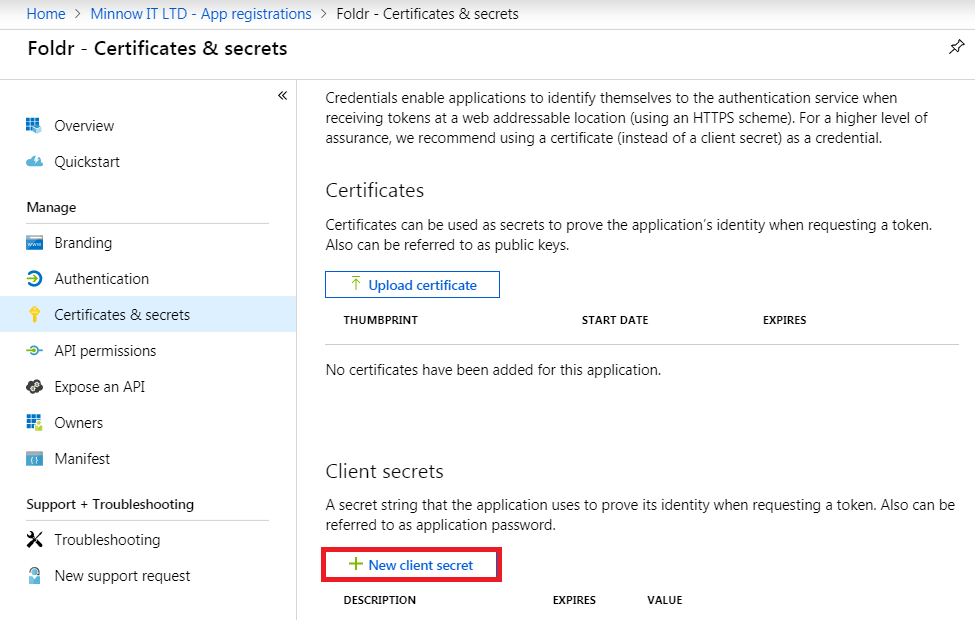
6. Enter a description, select a suitable expiration lifetime, and finally click ADD. Note a long client secret lifetime is recommended, otherwise the Foldr integration will stop working.

7. The new client secret will be displayed.
IMPORTANT – You should take a copy of the key value at this point as you cannot retrieve it again later, however new keys can be generated later, if required.

8. Click API Permissions > Add a permission
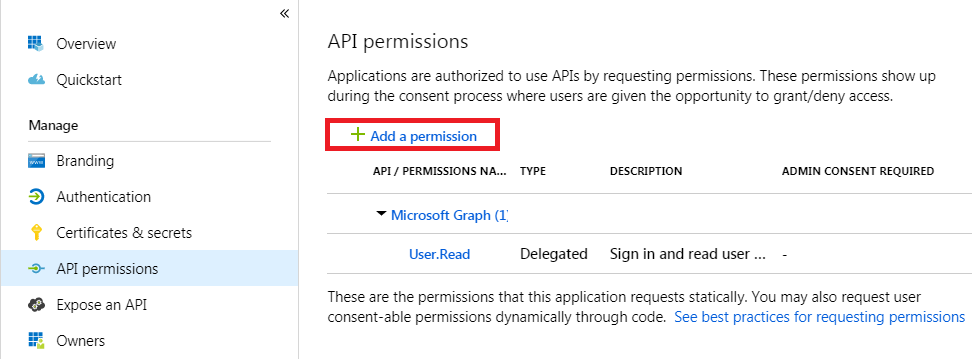
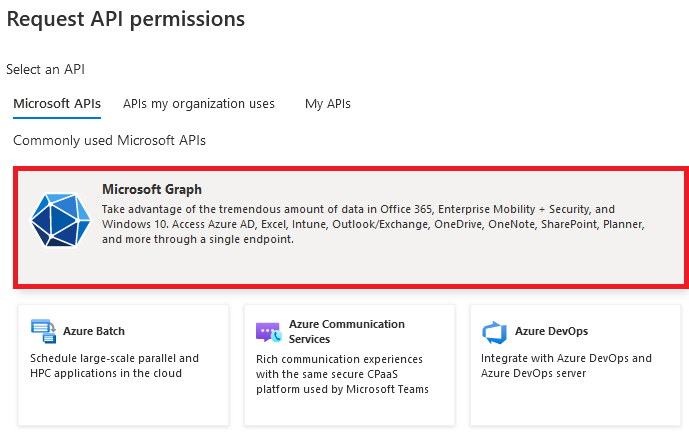
9. Select Microsoft Graph
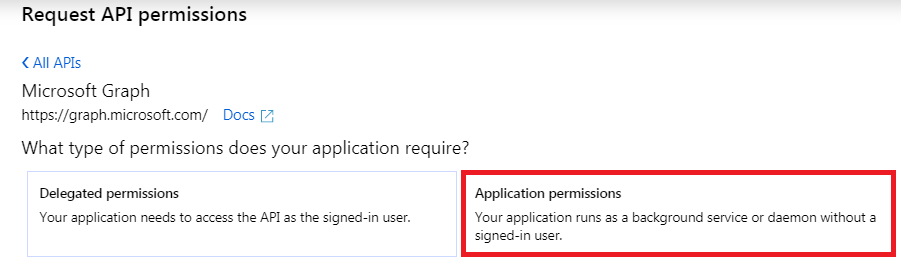
10. Click Application Permissions.
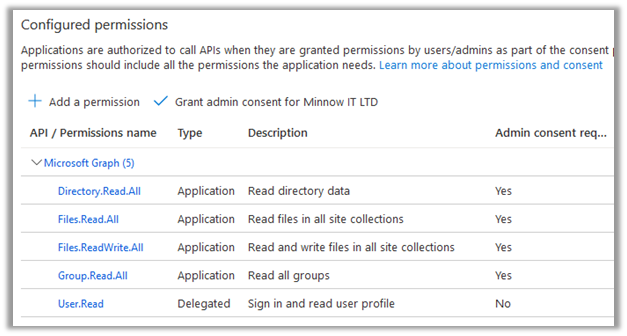
11. Select the following permission from the Files section:
Files.ReadWrite.All
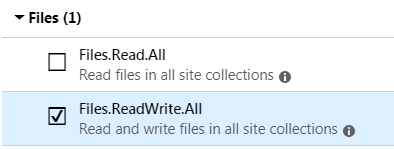
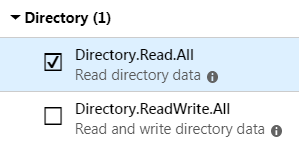
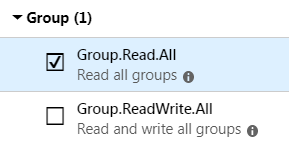
If presenting Teams and SharePoint storage to users, also enable the following additional permissions from the Group and Directory sections:
Directory.Read.All
Group.Read.All
12. Click Add Permissions at the bottom of the screen.
![]()
13. The permission summary will now be shown showing the new Application permissions.
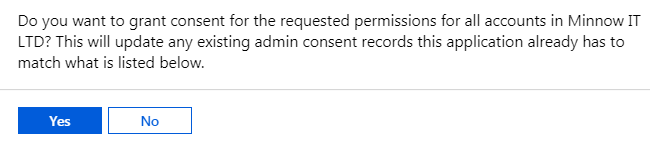
14. Click the GRANT ADMIN CONSENT for … button at the bottom of the screen.

15. Click Yes on the confirmation prompt.
16. A success message will then be shown

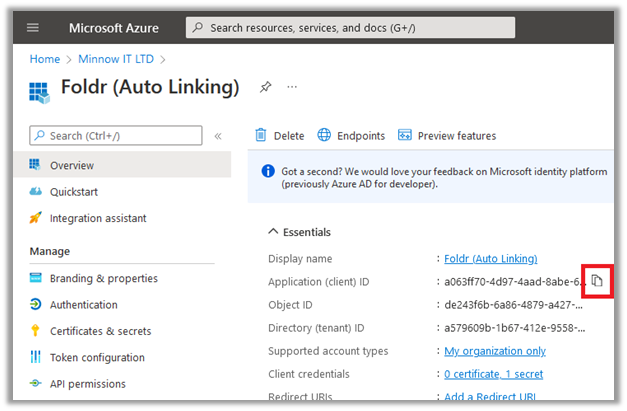
17. Click on Overview and take a copy of the Application (client) ID and Directory (tenant) ID – these will be required later.

Creating the Microsoft Service Account
A Microsoft service account must now be created within Foldr Settings > Integrations > Service Accounts
The Application (client) ID as shown in Overview panel should be copied into the Client ID field.
The Client secret as created in at step 5 above should be copied into Application Key field
The Directory (tenant) ID as shown in the Overview panel should be copied into Tenant ID field
Creating the Microsoft Office 365 service account
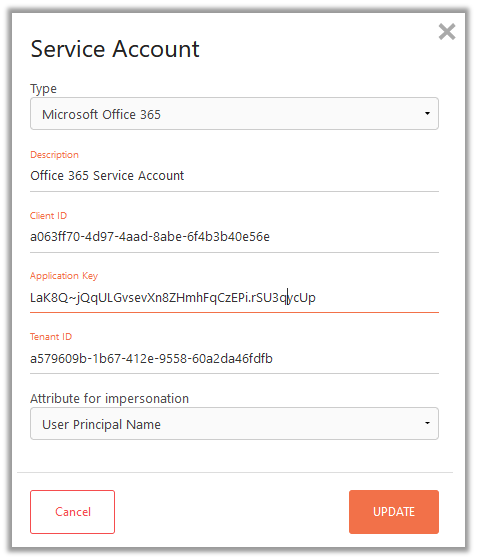
Attribute for impersonation
You must finally select the Active Directory Attribute that is going to be used to match against the corresponding Office 365 account.
Typically, either the user’s User Principle Name (UPN) or email address will match the Office 365 email address used to identify their account. If neither of these attributes match, you can select the ‘custom’ option to build your own matching rule, such as %username%@office-365-domain.com
Click SAVE
Enable the OneDrive intergration & Change Background Account Access
Navigate to Foldr Settings >> Integrations >> Microsoft Azure
Enable OneDrive integration and select the service account.
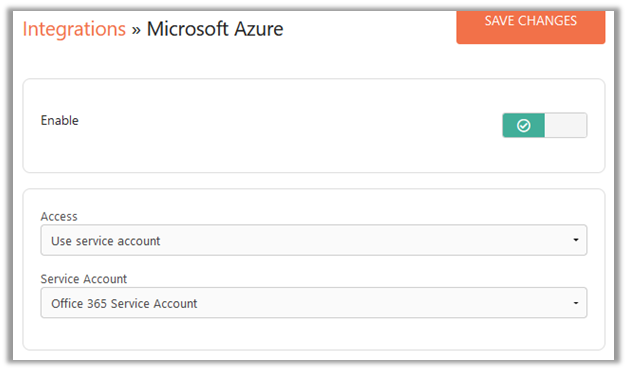
Enable OneDrive integration and select the Microsoft service account.
Please note, as we are not using manual linking, you do NOT need to complete the Application ID or Key fields here:
Add the Storage Item for OneDrive
A new Share should now be created for OneDrive under Foldr Settings > Files & Storage the storage address %onedrive% to present the users OneDrive storage within the Foldr interface. Give the share a suitable name, icon and any other options that are required.
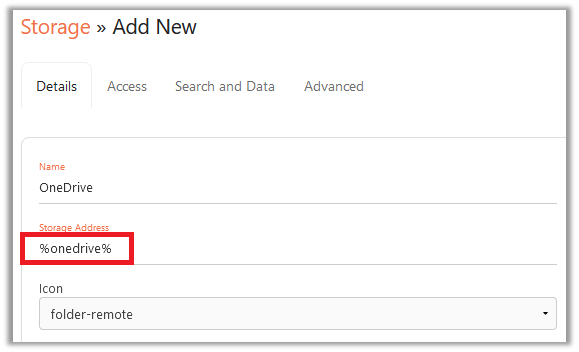
Click the Access tab and select the Microsoft service account on the OneDrive share configuration screen
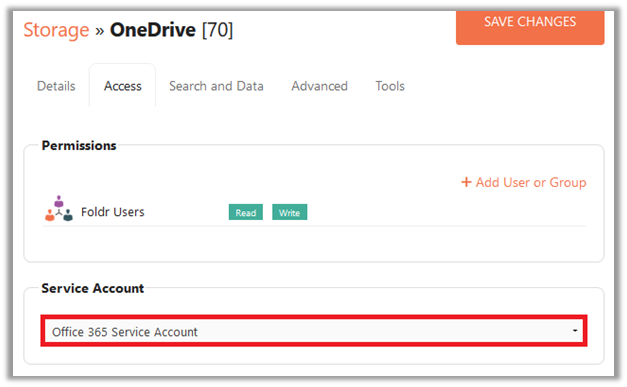
Finally, Click SAVE CHANGES.
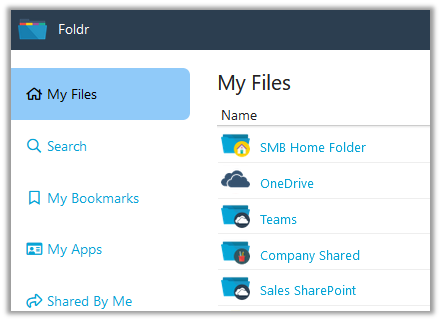
The integration steps for automatic account linking and presenting OneDrive to users is now complete. When a user signs into Foldr, their corresponding OneDrive storage should be presented to the user automatically.
Presenting SharePoint sites to Users
A dedicated KB article covering SharePoint sites is available here
The basic steps to present a SharePoint site are:
Create a new storage item should be created for each SharePoint site (or Document Library) under Foldr Settings > Files & Storage using the storage path:
%sharepoint%(tenant.sharepoint.com/sites/site-name)

Note if /sites/ is not in the SharePoint URL when viewed through O365 directly, it can be removed from the Share URI
The administrator can present the root SharePoint site for an organisation using the Share URI %sharepoint%
On the Access tab, select the Microsoft service account on the SharePoint share configuration screen.
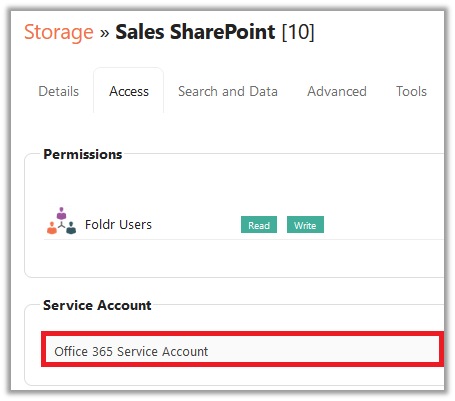
Click SAVE CHANGES.
Presenting Teams storage to Users
A new share should be created for Teams under Foldr Settings > Files & Storage using the storage address %teams% – note the additional Application permissions for Teams are required (Read directory data and read all groups). All Teams storage will be displayed within this one storage location in Foldr.
Select the Microsoft service account on the Teams configuration screen Access tab.
Presenting Shared Office 365 items to Users
Foldr can present files/folders that have been shared from within Office 365. Shared items can be displayed in a dedicated share/storage item within My Files or alternatively a ‘Shared with Me’ directory can be displayed inside a user’s OneDrive and all shared items will be available inside.
To create a dedicated share for Office 365 shared items, create a new item within Foldr Settings > Files & Storage using path %onedriveshared%. To present a user’s OneDrive with a ‘Shared with Me’ folder in the root of OneDrive, create a share and set the path %onedrivewithshared% If automatic linking is being used, select the Microsoft service account on the Access tab.
Troubleshooting – HTTPS / SSL inspection
Please ensure the following domains are excluded from HTTPS / SSL man-in-the-middle inspection on your firewall / web filter, as this will cause issues between the Foldr and OneDrive / SharePoint Online:
graph.microsoft.com
api.office.com
login.microsoftonline.com
{office365-tenant}-my.sharepoint.com
i.e. company-my.sharepoint.com